◆ Exhibition Contents & Highlights
The photo spot area allows visitors to take pictures.
Prologue area
![[Photos/Images] Experience 10 Years of “My Hero Academia” and Behind-the-Scenes Production! Kohei Horikoshi “My Hero Academia” Original Art Exhibition Now Open 2nd](https://times-abema.ismcdn.jp/mwimgs/4/5/724w/img_45226840c7a75eceaeb83583e6d347f43810587.jpg)
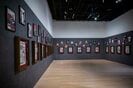
The prologue area that greets visitors at the beginning of the exhibition revisits numerous events from within “My Hero Academia” through an original tabloid display. In addition, all 41 cover illustrations from the manga volumes released over the 10-year serialization are displayed together. Visitors can enjoy Horikoshi’s beautiful color art while experiencing the series’ decade-long journey.
Zone 1: “Dream (Kakū)” Becomes “Reality.”
![[Photos/Images] Experience 10 Years of “My Hero Academia” and Behind-the-Scenes Production! Kohei Horikoshi “My Hero Academia” Original Art Exhibition Now Open 3rd](https://times-abema.ismcdn.jp/mwimgs/b/4/724w/img_b4916227311019c2cb4e5627f189df063721829.jpg)
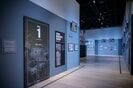
The story begins as Deku meets All Might. This zone looks back on the heroes’ growth through various incidents and school events, from entering U.A. High to the “All-Out War,” accompanied by valuable hand-drawn manuscripts. Special commentary explains Horikoshi’s state of mind when drawing each episode. Additional comments from Horikoshi about each area are also displayed in Zones 1 through 4.
Zone 2: The End of a “Hero-Saturated Society.”
This area exhibits original drawings up to just before the “Second War.” Here, not only fully finished digital manuscripts but also many handwritten materials produced during the creative process—such as line art and storyboards—are on display. Particularly noteworthy is the life-size “Dark Deku” figure, crafted based on a newly drawn sketch by Horikoshi specifically for this exhibition, exuding a remarkable sense of presence as if it could spring to life at any moment.
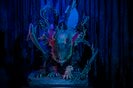
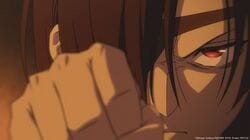
Life-size “Dark Deku” Figure
![[Photos/Images] Experience 10 Years of “My Hero Academia” and Behind-the-Scenes Production! Kohei Horikoshi “My Hero Academia” Original Art Exhibition Now Open 4th](https://times-abema.ismcdn.jp/mwimgs/d/5/724w/img_d53dbc20dd0b5454889ef6e4f23793d82841648.jpg)
Symbolizing this zone, which depicts the devastated world at the start of the work’s final chapter, is the life-size figure of “Dark Deku,” a fan favorite in the series. Sculpted by WATANABE x REN, renowned for producing many “My Hero Academia” figures, the piece is meticulously crafted based on an original sketch by Horikoshi. The high quality and attention to detail are must-sees.
Zone 3: Heroes and Villains, the Final Battle.
![[Photos/Images] Experience 10 Years of “My Hero Academia” and Behind-the-Scenes Production! Kohei Horikoshi “My Hero Academia” Original Art Exhibition Now Open 5th](https://times-abema.ismcdn.jp/mwimgs/2/5/724w/img_257988b5cecfee55f358ff12eb5f22602793069.jpg)
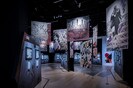
The panoramic space dynamically expands the depiction of the “Second War” and its trailing devastation. Visitors can experience the final battle between the heroes and villains amid the buried rubble. Each battle is revisited along with Horikoshi’s commentary.
Zone 4: Feelings That Connect and Are Woven Together.
![[Photos/Images] Experience 10 Years of “My Hero Academia” and Behind-the-Scenes Production! Kohei Horikoshi “My Hero Academia” Original Art Exhibition Now Open 6th](https://times-abema.ismcdn.jp/mwimgs/a/5/724w/img_a5e6a7fce57235d64c366afd196b16944716189.jpg)
This area showcases the climactic battles between Tomura Shigaraki and All For One, and the “story where everyone became the greatest heroes” in a powerful exhibition space. A key visual by Horikoshi, “Heroes vs. Villains,” makes a grand appearance as an enormous panorama photo spot.
Zone 5: The Chronicle of “Daily Life” the Boys and Girls Regained.
![[Photos/Images] Experience 10 Years of “My Hero Academia” and Behind-the-Scenes Production! Kohei Horikoshi “My Hero Academia” Original Art Exhibition Now Open 7th](https://times-abema.ismcdn.jp/mwimgs/e/e/724w/img_ee436315bf8e968811e060e32daadc5d3301664.jpg)
Lineart from the newly drawn episode No.431 in the final manga volume is on special display. Guests can also see the exhibition’s key visuals “Heroes vs. Villains,” “Izuku Midoriya & Tomura Shigaraki.” Furthermore, the exhibition-original “Special Illustrations ‘Snapshot’”—conceptualized as photos taken by Deku, depicting the characters’ lives after the story’s conclusion—showcases a series of beautiful, newly-drawn illustrations.
Next Page- English
- 日本語